Saturday, July 29, 2017

Ghost Pipe Plant

All gardeners have bucket lists - plants they'd love to grow, gardens they want to visit, plants they want to see.  I was excited to be able to check one of my bucket items off the list this week.  While walking near some woods, I spotted a plant I had always wanted to see since first hearing about it: the Ghost Pipe Plant!

Ghost Pipe Plant
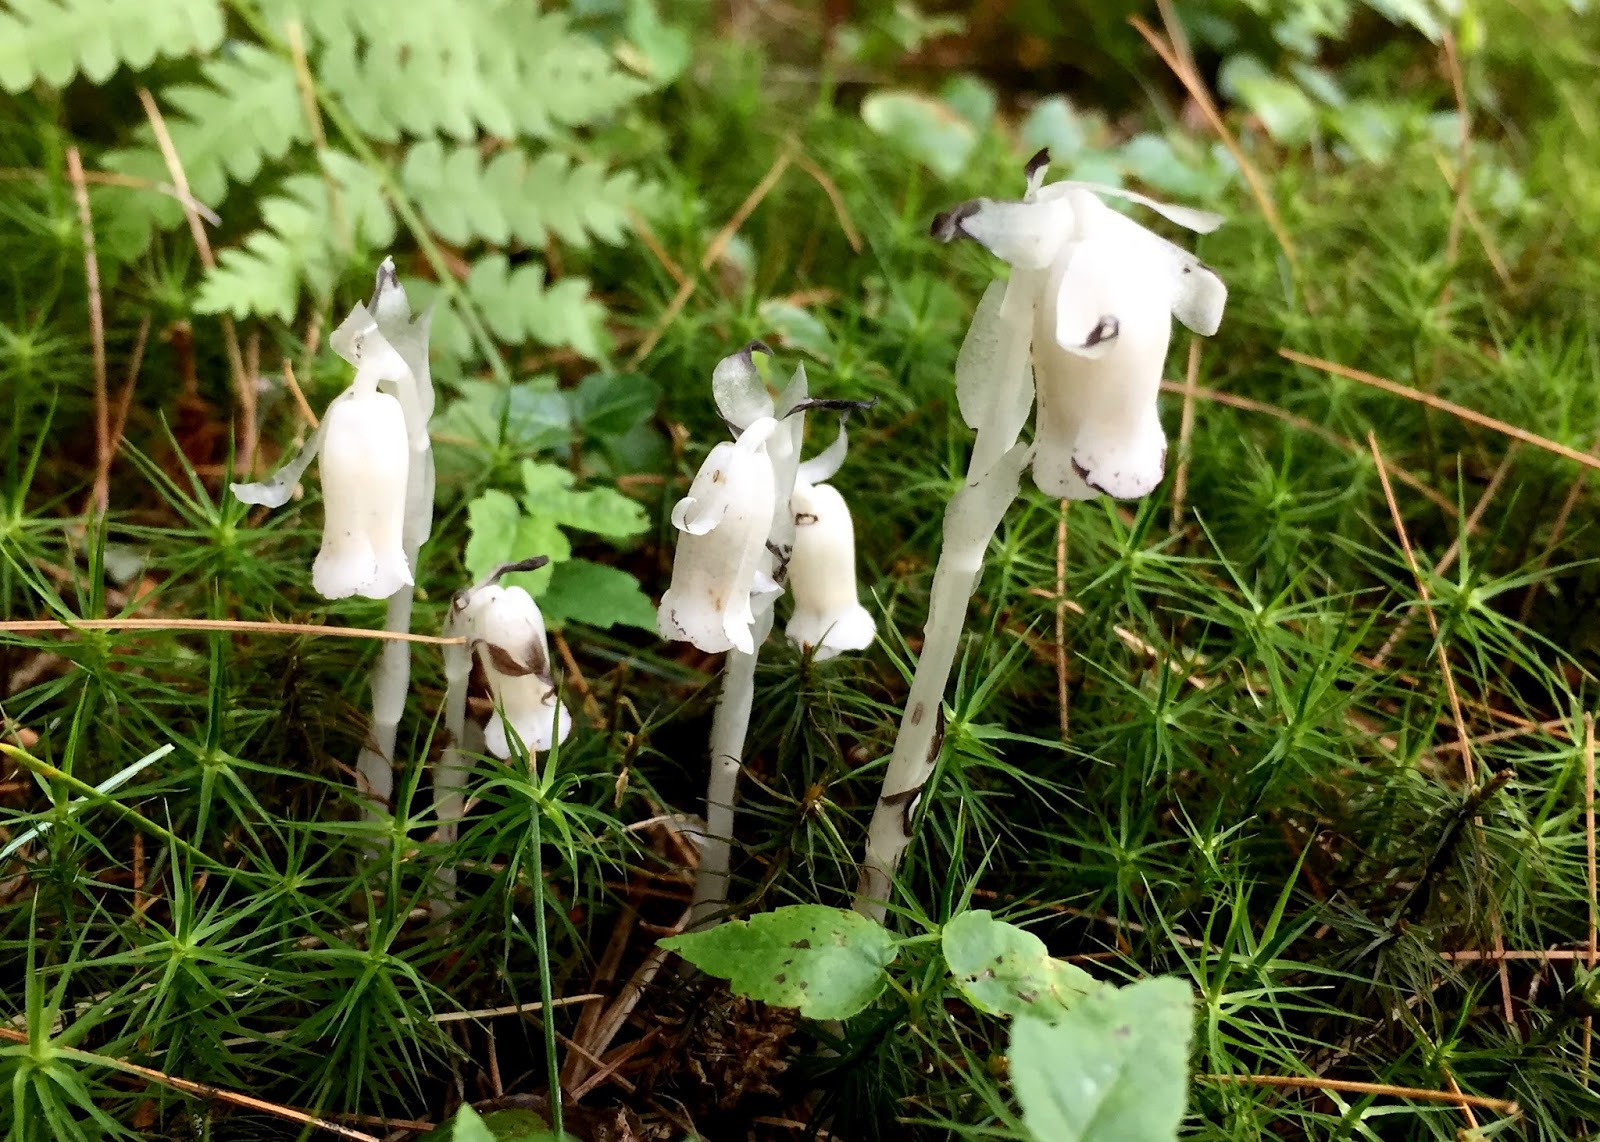
The Ghost Pipe Plant (Monotropa uniflora), aka Indian Pipe or Corpse Plant, is a perennial wildflower that is native to parts of North America and areas of Asia, European Russia, and northern South America.  This tiny plant is fascinating in that it doesn't contain any chlorophyll.  It is usually completely white, but will sometimes have some pink or even red coloration.


Instead of getting energy from the sun, the Ghost Pipe plant is parasitic.  It grows on types of mycorrhizal fungi which in turn grow on tree roots.  The mycorrhizal fungi, which usually grows on leaf litter, gives nutrients and water to the tree roots in return for sugars from the tree.  The parasitic Ghost Pipe steals some of these sugars from the fungi.  It's quite a complex relationship, which is why these plants are somewhat of a rare and delightful find!  They are pretty much impossible to transplant or propagate.

emerging Ghost Pipe plants
Because it does not need the sun, Ghost Pipe can grow in deep shade.  It is mostly found in damp, rich, mature woodlands, which is the type of place that I found this colony of Ghost Pipe plants growing.


Like its botanical name Monotropa uniflora suggests, each stem just has one flower which blooms for a week or two anytime from late spring to fall.  The flower is pollinated by small bees, after which the flower turns upwards and is then replaced by a seed capsule.  The stem turns black and dies off, but the perennial root mass will live to bloom the next year.


Ghost Pipe was used medicinally by some Native Americans tribes as an anti-convulsive and an analgesic, as well as to treat conditions such as eye problems, bunions, and fevers.  It is still occasionally used by herbalists, unfortunately leading to over-harvesting in some cases, making this plant even rarer.   Interestingly, grizzly bears have been known to dig up the root mass to eat it.  While raw Ghost Pipe is mildly toxic for people, it is said to be edible (though bland) in small to moderate amounts.  When cooked, it is said to taste rather like asparagus, though I would not recommend picking this plant at all.  Rather I would advise leaving these tiny wildflowers undisturbed so that more people can have the fun of spotting such an unusual plant. 


I know I got a thrill out of it!


Tuesday, July 18, 2017

Excited For Aphids

Every year without fail, some of the leaves on my River Birch change, becoming weirdly distorted and deformed.


This leaf distortion is actually caused by aphids - Spiny Witch Hazel Gall Aphids, to be exact - which feed on birch leaves starting in the spring and then eventually move on to Witch Hazel trees for the second part of its life cycle.  The infested birch leaves ultimately shrivel up and fall off the tree prematurely.


So it's a bad thing for your tree to be attacked by aphids every year, right?


Surprisingly, it can actually be a great thing!  The infestation of aphids is usually not heavy enough to harm the health of the tree.  It does, however, attract all sorts of beneficial predators to the garden.


The infected birch is like a magnet for ladybugs.  There are always a lot of them on my tree.  They eat the aphids and lay their eggs there.  The larvae that hatch eat even more aphids and eventually turn into even more ladybugs for the garden.

ladybug larvae eating aphids on birch leaf
Other interesting insects attracted by the aphids include this Tree Cricket nymph. Tree crickets and their nymphs love aphids and scale insects and can be beneficial to a garden (though they can occasionally become a pest for orchards as they also like fruit).

Tree Cricket nymph on birch leaf
Believe it or not, there are actually beneficial wasps to have in the garden, such as this little Mason Wasp.  They prey on many larval insects including aphids and are non-agressive and rarely sting.


 My favorite things that are attracted by the aphids, however, are the birds.

Baltimore Oriole
Most of the birds that I see eating aphids on the tree are ones that I see commonly at my nearby bird feeders.  The Baltimore Orioles, though, have never come to a feeder (despite my attempts).  I only see these beautiful birds up close when they come for the aphids.


It makes you almost want an aphid infestation, doesn't it?

Saturday, July 8, 2017

How to Make a Vertical Pallet Garden for Shade

This spring when I came home with a bunch of free leftover shade plants after working at our garden club's annual plant sale, I knew just what I wanted to do.

shady pallet garden!
We've had a stack of pallets sitting in our basement, and I've been toying with the idea of making a pallet garden out of one for awhile.  We had a bare wall by our patio that really could use some livening up, and a pallet garden was perfect.  Now that I had the plants, it was time!


Here is what I did to make my pallet garden:

Step 1:  Painting.
I chose to spray paint the pallet black, since I really wanted to showcase the plants.


I only wanted four rows of plants (no plants on the very bottom), and I wanted to be able to put taller plants in my pallet garden, so this pallet that I had was perfect.  (If you want to recreate this garden and your pallet has too many boards on the front, you will need to pry some of the boards off.)

Step 2:  Make pockets for the soil and plants.
I made 8 pockets in total, since there's a board running through the middle of the pallet, and I made them out of landscaping fabric.  For each pocket, I cut the landscaping fabric slightly longer than the pocket would end up.


I then folded the landscaping fabric up so that the pockets would be a double thickness of fabric.  I then folded it up in half again (same way) to make a double-thick pocket.


I then stapled most of the way down each side.


To give the pocket more of a bottom, I then flattened the bottom part and stapled it flat on each side, like so:


Thus the bottom should make a 'Y' shape, and each side of your pocket should end up looking like this:

the bottom of the pocket
Now for the magic: turn the pocket inside out (or should I say 'right side out'?)

making a pocket for a pallet garden
Tada!  It should look like a (double-thick) pocket now.

Step 3:  Stuff the pockets inside the pallet and staple them all around the inside with a staple gun.

(This is easier said than done, as it takes a loooot of stapling.  You want those pockets secure!)


Step 4: Fill with dirt and plant!


My pallet garden is leaning against the wall on the north side of my house, and it is also under a deck, so I used plants that would do well in the shade.  I used the plants I happen to have, which included: white and red Wax Begonias, Astilbe, Variegated Solomon's Seal, Epimediums, golden Creeping Jenny, golden Japanese Forest Grass, and a couple ferns that I scrounged from my shade garden.


I have to thank my mother-in-law for giving me a whole tray of Wax Begonias that she had bought and didn't need, as they really add great pops of color in the pallet garden.


I'm so happy with how it turned out!  We'll see how it ages through the summer.  I'm really hoping to overwinter some of the perennials for next year, too, so we'll see how that goes.


Happy gardening!


Related Posts Plugin for WordPress, Blogger...