Showing posts with label Shrubs. Show all posts

Wednesday, June 24, 2020

Juneberries

Towards the end of strawberry-picking season and before the blueberries start, there is the picking of the Juneberries.

Juneberries
Never heard of Juneberries?  I hadn't either until about three or four years ago.  In fact, 'Juneberry' is a more recent American marketing name for the harder-to-pronounce but much-more-fun name of Saskatoon berry.


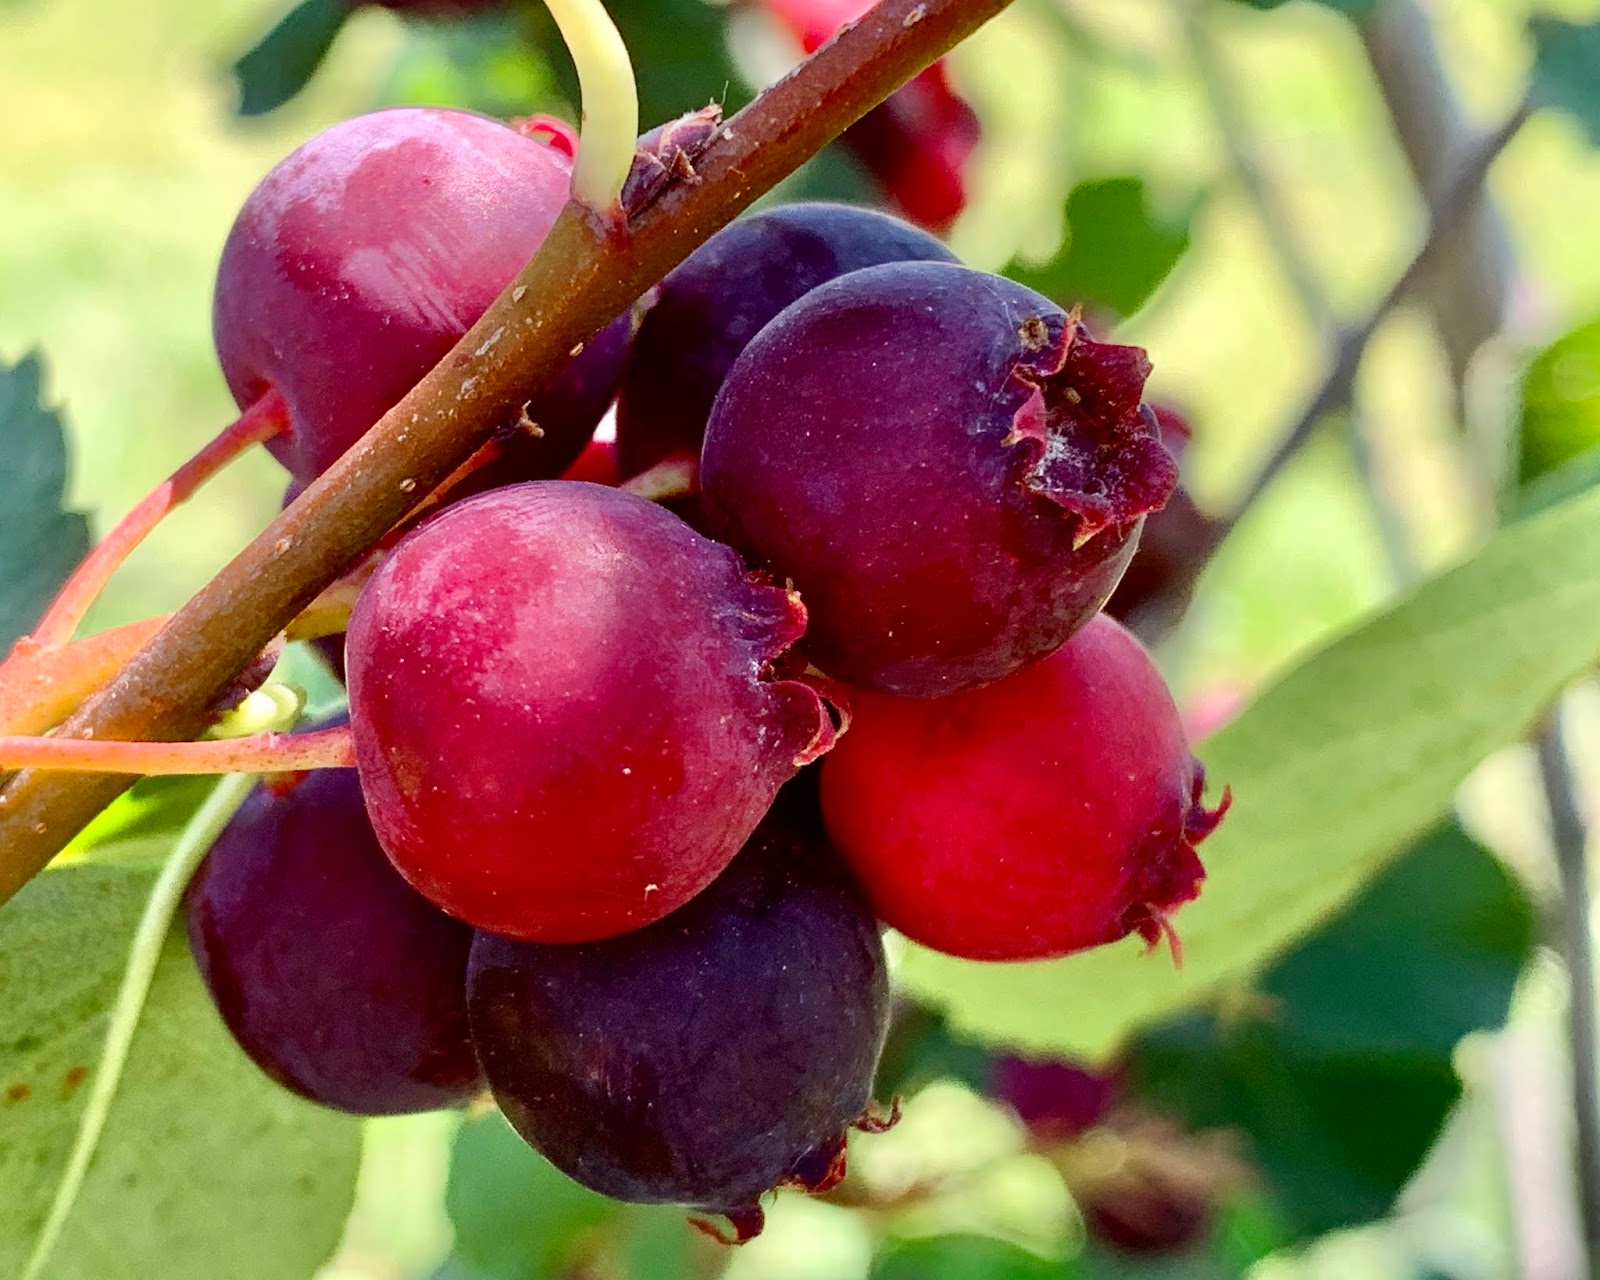
Also historically known as pigeon berries or serviceberries, these shrubs are native to North America.  The species commercially grown is Amelanchier alnifolia, which is a close cousin of our Eastern serviceberry (A. canadensis), which commonly grows around here.  The berries are more well-known in Canada, especially in Saskatchewan, which holds a Saskatoon Berry Festival in the town of Mortlach every year (except this year, thanks to Covid-19).


The name of 'Saskatoon' is said to be from the Cree language word misâskwatômina (Mis-sack-qua-too-mina), which means “the fruit of the tree of many branches”.  The city of Saskatoon, Saskatchewan, has similar origins.  Historically the berries were often used in pemmican, as well as used medicinally for a variety of illnesses.  The berries also feed various wildlife such as birds, squirrels, and bears, and the shrubs are a larval host for several swallowtail butterflies.


Juneberry/Saskatoon berry plants are deciduous and grow in a wide range of soils, though they prefer well-draining spots.  They can be grown as shrubs or small trees and can reach 16 feet tall.  White flowers bloom in spring, followed by the berries in late June or early July.  The berries are very nutritious, containing high levels of protein, iron, calcium, and antioxidants.

picking Juneberries
A local farm started offering Juneberry picking, and last year we tried them for the first time. The taste is said to be sweet with hints of almond and cherry.  The kids especially were excited to try them - but upon tasting them we found them to be not that great raw.  They were sweet, but on the tart side, and rather watery and seedy.  So I baked them into a pie...

Juneberry pie
...and wow.  It was absolutely delicious!  My oldest daughter, who had never cared for a fruit pie in her life, enjoyed it immensely.  One year later, she is still talking about that pie.  This is obviously a fruit that improves upon baking.


Juneberry picking season has just started here, and the farm is letting small numbers of people come pick on appointment, so we will be cautiously venturing out for more Juneberry acquisition.


Wish us luck (and many juneberries/saskatoon berries)!
Happy gardening!

Monday, May 22, 2017

A Shady Progression

The past few weeks have seen the normal spring rush of planting, reworking garden beds, preparing for our garden club plant sale, and attending end-of-the-school-year events for me.  It is so great to be outside in the beautiful spring weather.  While the vegetable garden always demands and receives  some attention in spring, lately my main gardening focus and delight has been on the shade garden.

working in the shade garden - spring 2017
My shade garden is at the Northwest corner of the house.  It has an awkward corner shape and transitions from deep shade right next to the house to sun near the edges, with pockets of hot afternoon sun that sometimes poses a challenge for plantings.  It also is where all of the ugly utility boxes are mounted.  It is a work in progress (isn't it always?), but it has come a long way in the last three years, and I enjoy looking back and seeing its progression from barren nothingness.

spring 2014
This is the only 'before' photo I could find of this area, from the spring of 2014.   This corner slopes downwards and to the left. This photo is from when we put in drainage to redirect water that was leaking into our unfinished basement from the gutter spout.  A couple large boulders on the left hold up soil.

fall 2014
In the fall of 2014, Mr. Red House and I built a low retaining wall to help with the slope.  With the addition of more soil, my shade garden was born.

2015
That fall and the next spring we put in a few tiny trees - two Japanese maples, a weeping Canadian Hemlock, and a little Carolina Silverbell - and started putting in plants, including Japanese anemone.  Stepping stones were added to make a clear path to all the utility boxes.  Native ferns happily pop up by themselves near the house, which we enjoy.

2016
In 2016 we added a few more plants.  I used the sunny edges of the wall to grow Ground Cherries (which the chipmunks promptly ate for their water content during our drought).  The Japanese anemone and ferns started getting a little out of control, and there wasn't enough access to the utility boxes without wading through plants.  The shade garden really needed some work.

2017
This spring I pulled out some of the plants, moved some around, and added more much-needed stepping stones to the utility area. The shade garden now has a lovely progression of flowers throughout the spring beginning with early spring bulbs and including a number of miniature daffodils that are planted along the edge of the retaining wall.

the miniature daffodil 'Mite'
In later spring blooms the brilliant pink of the Rhododendron 'Weston's Aglo', a small-leaved rhododendron hybridized by the nearby Weston Nurseries.


The pink is mimicked throughout the garden by Old-fashioned Bleeding Heart, a favorite of mine ever since seeing it growing up in my grandmother's garden...

Old-fashioned Bleeding Heart
...and then continued by the dark pink Azaleas.


The bright pinks are softened by touches of white from Summer Snowflakes and hostas...


 ...as well as the blooms of the now much-larger Carolina Silverbell.

Carolina Silverbell tree
Another favorite of mine, the Foamflower, blooms in a little cloud of softer pink. 

birdbath with foamflower blooming on the right
Other spring blooms in the shade garden include epimediums, ajuga, lungwort, lanium, and brunnera.   Later will bloom white clematis, cotoneaster, heuchera, hostas, ligularia, iris, Japanese anemone, and grey-headed coneflowers that I have planted along the sunny edges of the garden.

purple heuchera leaves contrast with that of a weeping Japanese maple
This spring I also acquired a few special native woodland plants - trillium, bloodroot, and trout lily - that I tucked under the growing trees and look forward to seeing in bloom next year.  The shade garden is filling out!


There are still some plants to move and things to do, but I love the progress on my shade garden so far...


...and happily I'm not the only one.


Wednesday, September 24, 2014

Winterberry Hollies

It may be officially fall, but it's beginning to look a little like Christmas in my front yard - my Winterberry Hollies are on full berry display!

Winterberry Holly
The Winterberry Holly, or Ilex verticillata, is a shrub native to Eastern North America.  It is native to swampy areas, so, like many of our native hollies, Winterberries are great shrubs for poorly drained soil (hello, clay!).


So why are they called Winterberries?


Winterberry Hollies are actually deciduous.  Their leaves fall off, leaving just the gorgeous berries that remain over winter (thus Winterberries!)  I know many people prefer evergreen hollies, but I like the softer leaves of the Winterberries better than many of the stiff, glossy evergreen varieties.  And how gorgeous do these branches look with just beautiful red berries on them?

Random fact:  Of the 400 species of hollies in the world, only about 30 are deciduous.
Cut branches are often used in Christmas arrangements.  You don't even need to put them in water; dry cut branches will keep well for weeks.  Left outside, on the other hand, they will only last until the birds get to them!  Last year all of my berries were gone by February, but we had so much fun watching the birds while they were eating them.

I think the Winterberries attracted every Bluebird on this side of town!
Wanting shrubs with beautiful winter interest, I planted 'Winter Red' Winterberry Hollies on either side of my front door.  The cultivar 'Winter Red' is supposed to get between 6 to 9 feet tall and 6 to 8 feet wide.  Of course, being a berrying holly, 'Winter Red' is a female.  In order to get those beautiful berries, the girls need a gentleman caller, for which I have the compact 'Jim Dandy' Winterberry tucked into a corner of the yard.

('Winter Red' is actually supposed to prefer the later pollinating 'Southern Gentleman', but 'Jim Dandy' seems to do the trick for mine - either that or my girls have been seeing other males on the side, which is very possible with all the wild hollies that loiter in my neck of the woods...)

Winterberry Holly 'Winter Red'
There are quite a few different cultivars of Winterberry Holly. Some of the popular ones include the short and compact 'Red Sprite', the very berry-heavy 'Berry Heavy', and the yellow-orange berried 'Winter Gold'.

Winterberry Holly 'Winter Gold'
photo source: J. Reeves, UT Gardens
Winterberry Hollies can be grown in full sun or partial shade, but they will produce more berries with more sun.  Most cultivars are hardy from zones 3 - 9, and they have very few problems with disease.  These extremely hardy shrubs are also tolerant of air pollution, clay soil, wet soil, erosion, and zombies... (just kidding, though they are deer-resistant!)  They are relatively slow-growing shrubs, though, so it is a good thing that they are deer-tolerant!


The one thing they don't tolerate, however, is alkaline soil - only plant Winterberries in acidic soil unless you want them to turn yellow and keel over on you.  But if you are looking for a great shrub to plant this fall in one of those tough, wet, clay (and acidic) sites, Winterberry Holly just might be the ticket!


Happy Fall Gardening!

Friday, August 15, 2014

An August Turn About the Front Gardens

It's been a nice, cool summer this year, and while that hasn't been so great for all my spicy pepper plants, the flowers are loving it.


In the front of the house, the Purple Coneflowers and Nicotiana are still going strong, and the Cosmos are starting to bloom.  The rockstar of the front garden right now, though, is my Hibiscus 'Cranberry Crush'.  Is it possible to outshine this?

'Cranberry Crush' Hibiscus
This Hibiscus is a hybrid cultivar.  Its parentage includes various hybrids of the native species H. moscheutos, H. coccineus, and H. laevis.  I absolutely love the billowy, cupped shape of the flowers, and the foliage is even quite pretty, with a reddish tint to the leaves.


On the other side of the driveway, though, my blue garden is trying it's best not to be outshone.  The blue Balloon Flower has been blooming nearly all summer long, and next to it is blooming some amazingly blue Salvia.  (The seed packet was labeled 'Sky Blue' Salvia, but I'm guessing it is the same as Salvia farinacea 'Victoria'.)  They look absolutely beautiful next to the 'Worcester Gold' Caryopteris with its contrasting golden leaves!


Sadly, the blue Salvia are so little that they really need a mass of plants to make more of an impact.  Very few of the seeds in the packet even germinated so I didn't get too many plants, but what can you say?  It was one of those impulse seed packet buys from a grocery store.  (You know we've all done it!) Thus the moral of the story is to stick with seeds from reputable dealers only...

Thankfully, my Balloon Flower has quite a presence!
In addition to working on the bed around my new red greenhouse, I've also been determined to do something this summer with the strip between the road and the sidewalk (known in the gardening world as 'the hellstrip') next to my mailbox.  I've planted some grasses, more Purple Coneflowers, Coreopsis, Nicotiana, and Yarrow there.  I can't wait until my plants get large enough to choke out all the weeds that have been constantly springing up!  (The weeds love this weather, too!)


I've also transplanted a few rocks that I found growing in my yard.  So far out of everything they seem to grow the best here, no matter the weather.  The rocks do quite fine with transplanting - the gardener, not so much.  It seems anytime I move rocks around my yard, it irritates the tendonitis in my wrists, so I am back to being good for a few weeks.


I hope all of your gardens are enjoying the summer weather as much as mine is!  For more of what's blooming in gardens around the world, check out Garden Bloggers' Bloom Day over at May Dreams Gardens blog.


Happy Gardening!

Tuesday, November 5, 2013

Designing a Northeastern Garden

When we finally moved into our new house in Massachusetts three months ago, it didn't seem much like a home at all.  One of the problems was that the yard was completely bare in the front.  No foundation plantings, no grass, nothing.  On the positive side, I got to design my garden from scratch!

Ack, my house is naked!!  Quick, throw a few shrubs over its foundation!
Step 1:  Trees, Shrubs, and Hardscaping

The first step in designing a garden is to put in what is called the 'bones' of the garden - the main structures that really anchor all the other smaller plantings.  That usually means trees, shrubs, and hardscaping.  

In addition to trees and shrubs, I have two light posts and a few boulders in my garden.  One great thing about the Northeast - boulders are plentiful!  (Farmers would probably disagree about this being a great thing.)
I designed this garden with the winter season in mind.  It's easy to make a garden look good in the summer up here in the Northeast when everything is blooming, not so easy to make a winter garden look good - and all I hear from people up here is how long the winter is going to be!  So I focused on plantings that would look good all year long, such as... 

Evergreens:


On one side of our yard we put a Blue spruce.  The silvery blue of the needles match our house perfectly, and the birds love it!


Vanderwolf's Pyramid Limber Pine and a Blue Atlas Cedar are planted on the other side of my house.  I love how these two evergreens have totally different looks.

...and Foundation Plants with Winter Interest:

Deciduous trees and shrubs going in my yard needed to have either interesting bark or winter berries that would look good in winter!


Winterberry Hollies were planted on either side of my porch, and a River Birch tree with its fabulous light-colored, peeling bark was planted at the corner.


I also planted some Variegated Red Twig Dogwood shrubs.  In summer they have variegated, gray-green colored leaves that look quite pretty with our house color.  The leaves then turn a fabulous pink in autumn before dropping off to reveal bright red stems for winter!

Step 2:  Deciding on Color and Gardening Style

After putting in the main landscaping, it was time to take advantage of the end-of-the-season sales and get some smaller shrubs and perennials for the garden.  But what color scheme should I go with?  My previous Red House perfectly set the stage for a cheerful front garden filled with lots of yellow blooms accented by oranges, reds, whites, and purples.  

But my new house is a subdued grayish green with a hint of blue (yeah, I have no idea what color to describe it as).   However, it really lends itself to a.... pastel-colored English-cottage theme!

We're going pink and pastel here, very different for my garden!
For this theme I had to have roses, of course, though being the lazy gardener that I am, they had to be very hardy and non-fussy.   I found several 'The Fairy' Roses on sale, which are impressively still blooming despite our recent cold snap!  I also picked up several 'Magnus' Purple Coneflowers, several different shades of Salvia (I'm a sucker for salvia), Gaura, and some Great Blue Lobelia, among others.

The Great Blue Lobelia is perfect for a wet spot in the yard.
Step 3:  Plant what you love!

I know I had a pastel theme decided on, but I just couldn't resist putting some cheerful, bright yellow flowers somewhere in the garden.  Next to the garage side door I planted a little clump of Willow Leaf Sunflowers, which are fabulously supposed to get around 6 to 8 feet tall.  I can't wait.

I have big dreams for you, baby clump!
Step 4:  The fun has only just begun!

I still have a lot to fill in.  Bulb planting has started, and I'm already thinking about what plants to start from seed for next year.  Ah, such planning!  Hopefully it will carry me through the long, cold winter that everyone keeps warning me about!


But I must say, with the new beds and the landscaping 'bones' of the garden put in, my new house looks much more like a home!

Related Posts Plugin for WordPress, Blogger...